
Red velvet cake is a classic and popular dessert known for its vibrant red colour, moist, velvety texture, and hint of cocoa flavour. It’s often layered with cream cheese frosting and has a subtle hint of cocoa flavour, which complements the cake’s rich taste.
Let’s delve into the baking techniques, serving suggestions, tips and tricks, as well as some popular variations of red velvet cake.
Origin:
The exact origin of red velvet cake is debated, but it is believed to have emerged in the United States during the early 20th century.
The cake’s signature red color was originally achieved through a chemical reaction between natural cocoa powder and acidic ingredients like buttermilk and vinegar. The reaction would enhance the reddish hue of the cocoa, resulting in a vibrant red cake.
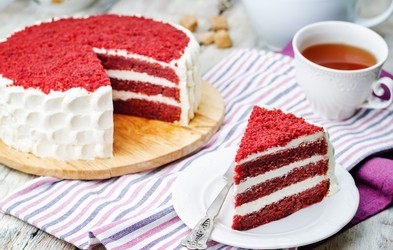
Serving Suggestions:
Red velvet cake is traditionally frosted with cream cheese frosting, which complements the flavours of the cake. The tangy cream cheese frosting balances the sweetness and adds a creamy texture.
Red velvet cakes are often decorated with a simple dusting of powdered sugar, sprinkles, or additional cream cheese frosting piped along the edges.
Some people also like to garnish the cake with red velvet cake crumbs or chocolate shavings.
Tips and Tricks:
Use a gel-based or concentrated red food colouring for a vibrant red hue. Start with a small amount and gradually add more until you achieve the desired shade.
If you don’t have buttermilk, you can substitute it by mixing regular milk with 1 tablespoon of lemon juice or vinegar. Let it sit for a few minutes until it curdles before using.
To ensure the cake stays moist, wrap each layer tightly in plastic wrap and refrigerate for a few hours or overnight before frosting.
Variations:
Transform the cake into individual-sized treats by baking red velvet cupcakes. Adjust the baking time accordingly, usually around 15-20 minutes.
Combine the flavors of red velvet cake and cheesecake by layering a rich and creamy cheesecake filling between the cake layers.
Make sandwich-like treats by baking small rounds of red velvet cake and sandwiching them with cream cheese frosting.
Bake a thin layer of red velvet cake, roll it with cream cheese frosting, and slice into beautiful pinwheels.
Remember, red velvet cake is a versatile dessert, and you can get creative with your own variations and decorations to suit your taste preferences. Enjoy baking and indulging in this delightful treat!
Print

Red Velvet Cake Recipe
- Prep Time: 20 minutes.
- Cook Time: 40 minutes
- Total Time: 60 minutes
- Yield: 8 1x
Description
This eggless Red Velvet Cake is a cocoa-flavoured, unique, moist, rich cake, served especially whether it be a wedding, or Valentine’s day, or birthday party, snack or an event/occasion. It takes only a few ingredients that you probably have in your kitchen, is incredibly soft, full of flavour that you can top with the layer with cream cheese frosting or buttercream. So let’s make it.
Ingredients
- 1 cup milk
- 1 tablespoon vinegar
- 1½ cup all-purpose flour
- 2 tablespoons cocoa powder
- 1 teaspoon baking soda
- 1 cup castor sugar
- ½ cup vegetable oil
- ¼ cup buttermilk
- 2 teaspoons vanilla extract
- 2 teaspoons lemon juice
- 4–5 teaspoons red food colour
- 2 cups salt for baking
Instructions
- Line your cake tin with parchment paper or brush with cooking oil and dust little all-pupose flour around the cake tin.
- In a mixing bowl, add milk and vinegar, whisk together and keep aside for 5 minutes.
- Sieve all-purpose flour, baking soda, and cocoa powder very well into a large mixing bowl.
- In a separate bowl, take sugar and oil and blend together using an electric hand mixer or a stand mixer until creamy.
- Add in the butter milk, vanilla extract and lemon juice.
- Add in the red food color.
- Meanwhile, add salt in a kadhai/wok and pre-heat for 10 minutes by placing a steel stand inside it. Cover with a plate or lid.
- Incorporate the dry ingredients to the wet ingredient mixture.
- Slowly add milk and vinegar mixture to the batter and mix with cut and fold method using spatula for 5 to 6 times till well combined. Do not over whisk at this stage.
- Pour the batter to the parchment paper lined cake tin and tap the cake tin well to remove the air bubbles.
- After preheating, place your cake tin in the pre-heated kadhai and let it bake at medium flame for 30-40 minutes. Alternatively, you can bake in a preheated oven at 180 degrees for 30-35 minutes.
- After 40 minutes check once with the skewer.
- If the skewer came out clean, cake is perfectly baked and if the batter is sticky then bake for 5 to 10 minutes more.
- Once the cake is baked, transfer the cake to cooling rack.
- Cover it with a cloth and set aside to cool down for 15 minutes. After 15 minutes, remove parchment paper and demould cake from the tin.
- Once it cools down, keep it covered in an airtight container.
- Frost the cake with your desired frosting next day.
- Enjoy!
Notes
- Beat sugar and oil until it turns creamy and fluffy. It gives the cake moistness.
- Buttermilk helps to add moisture and a slight tang to the cake.
- Use of vinegar and lemon juice make the cake super soft and velvety, so I would suggest you to use both for this cake recipe.
- Always use a good brand of red colour to get the perfect look of the cake.
- You can add 4-5 teaspoons of liquid colour or 3-4 drops of gel colour which gives this cake a nice bright red colour!
- Don’t over-mix the batter. Always mix with cut and fold process for 5-6 times. Over-mixing can cause the flour to become tough and result in a dry cake.
- The kadhai or saucepan must have enough height for cake to rise well.
- Make sure you cover the cake with a cloth while it’s cooling. It will help to trap moisture and prevent it from drying out.
- If you wish to preserve the cake for longer, make sure you store the cake in an airtight container properly.
- Additionally, if you wish to frost the cake then brush the layers with warm sugar water to make it extra moist.
- Category: Dessert
- Method: Bake
- Cuisine: American
Keywords: No-oven Red Velvet Cake, Eggless Cake Recipe, Valentine’s Day Cake, Best Homemade Red Velvet Cake, Red Velvet Cake Without Oven